ABOUT THIS BLOG

"A Faithful Attempt" is designed to showcase a variety of K-12 art lessons, the work of my art students, as well as other art-related topics. Projects shown are my take on other art teacher's lessons, lessons found in books or else designed by myself.
Thanks for visiting!
LAND ACKNOWLEDGEMENT I acknowledge, with deep respect, that I am gathered on Treaty 7 territory. I acknowledge the many First Nations, Métis and Inuit whose footsteps have marked these lands for generations. I recognize the land as an act of reconciliation and gratitude to those whose territory we reside on or are visiting.

Thursday, May 26, 2011

Landscape Magazine Collage


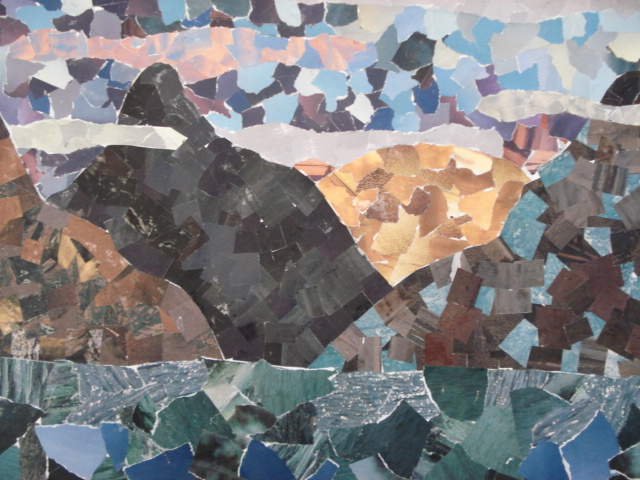
My Grade 9's recently finished their landscape collages. I wanted a landscape lesson that wasn't drawing-based and I also wanted to use up a bunch of old magazines and scraps of coloured construction paper, so this project was the perfect solution. It uses minimal materials to get quite lovely results.

Students were required to create a landscape that incorporated a background, middle ground and foreground.  For the paper, they had to use a combination of ripped and cut (with scissors) paper to create contrasting shapes and a variety of textures.

For inspiration, you could show students the work of California collage artist Eileen Downes.

They started by sketching out a plan for their landscape- a simple pencil drawing- and labeling what colours would go where. (see below)  They could re-create any type of landscape they wished (seascape, cityscape, landscape, etc). We used heavy-ish white paper, about 12 x 18 inches.


Then they looked through the magazines and ripped/cut/collected the necessary colours.
They started gluing, with watered down white glue and a paintbrush, from the sky (background) and worked their way down to the bottom.


I gave them manila envelopes to store all their pieces between classes. 
This project was quite time-consuming and took about 5-7 classes to complete. If you want to spend less time on these, use smaller paper- like 9 x 12". For my really slow-paced students, I accomodated them by giving them smaller paper to work with; it helped alot.
Once dry, students can protect them with a coat of water-based varnish (ie: modge podge, etc).


Ta da!


This is based on Claude Monet's painting "The Cliff' at Etretat"


The yellow brick road leading to Oz!


Sunday, May 22, 2011

Woven Painting


This student chose to do a self portrait.
 
 It's no secret to my students that I love weaving projects.
There's something about the methodical over-and-under process that I find so relaxing and satisfying.

Here's a paper weaving project I did with a Grade 10/11 class. I've also done it with Grades 7 and 8.

They essentially did a drawing of the same image twice (they traced the first image onto the same sized paper) and then painted them slightly different colours. 
They could either go for opposite colours to create a high contrast checkerboard effect,
or go for similar colours to create a more subtle effect.

So here's a drawing of a falling over champagne glass- drawn exactly the same twice.
We used a tracing table- a window would work as well.

Then paint them both- we used acrylics and/or watercolours.
This student below chose a subtle colour change for her Egyptian piece.


Once both paintings are dry, you need to fold one in half and draw a line about one inch from the open end of the folded paper. This is the limit of cutting. Students could measure their cutting lines with a ruler or free hand cut them.  Most chose to measure.  The thinner the strips, the longer the weaving will take to finish. These strips are known as the 'warp'strips. The strips don't need to be straight but all my students made theirs straight.

For the second sheet of paper, cut the strips all the way through.  I suggest to students to measure and draw all the lines out first on the back, with a ruler, then number them, in case they fall down, or get mixed up.
You won't use the first couple of strips on both the top and bottom.


So here's the weaving at the beginning stages. The blue painting below has been folded vertically and cut into the 'warp' strips. Then the pink/purple painting is being cut across- the 'weft' strips (1 cm) and those strips are being woven into the blue painting.


So here's the back of the painting that's going to be cut into the 'weft' strips. Number them on the back just in case. You need to weave them in order so that the painted image lines up more or less. It won't be perfectly the same and that's ok.  Students stress over this part and try to get it all perfectly lined up and it just doesn't work. That's not the point of this project. So I found I had to continually emphasize that the drawings do not have to line up perfectly!!!


You can number the strips on the back to keep them in order.
Especially useful if a gust of wind enters the classroom and blows the strips onto the floor... yes, it's happened.

Over, under, over, under and so on.


Then start weaving- over, under, over, under- this takes time and patience. When you have a few strips in and it looks good, glue down the edges with dots of white glue to keep it all secure.  Students will find they don't need to use all the strips- the may take out some half-way through that don't line up and that's fine.

Here's a link to a very basic paper weaving lesson that may make more sense than mine did ;)


Here are some of the early finishers:
Ta da!


this student left a large, wide border which I quite like.
 

this student was going for a brocade look.


Saturday, May 21, 2011

Cupcake Paper Flowers


This is a cute and easy Spring/Summer collage project that's great for reinforcing cutting, folding and pasting skills with younger students.  I've done this project with Grades K-2.

Simply take colored cupcake liners (2-3 per flower) and fold them as if you were cutting a snowflake: in half once, then again, then again if you wish.  Cut the edges in a decorative manner (fringes, wavy line, scalloped, etc), unfold and stack them together with a dab of glue. 
Glue decorative items in the middle (beads, buttons, pom-poms, glitter, etc).

Take a sheet of colored paper (I used blue for the sky) and paint on some green stems with leaves. 
Glue your cupcake flower on top.

For the grass, I had pre-cut wide strips of scrap green paper.  Have kids cut a grass edge (I demonstrate how to snip large triangles off the top); they could also cut a fringe, whatever you want.  Glue stick this grass on the bottom of the page and ruffle the grass a bit for a bit of a 3-D look.

These could easily be embellished further: have the kids paint/draw in a sun, rainbow, make bugs and glue them in the grass, etc. etc.


Wednesday, May 18, 2011

Dutch Tulip Fields


This is a lovely Spring project I found on the "Kids Artists" blog:

It's a one-point perspective lesson using the famous Dutch tulip fields. 
I like any perspective lessons that aren't streets or city scenes.

So I had my Grade 6 students draw a horizon line and then put a dot or the vanishing point somewhere along the line. Using a ruler, they drew the fields. Then they drew in a traditional windmill and trees, bushes, etc. along the horizon line.


Instead of using only marker, I had the kids use the marker watercolour technique which I like so much. 
They outline each section with a marker...


Then use a wet brush and blend over the marker. 
It bleeds and spreads and creates a wash of transparent colour.
They painted the skies with tempera discs.


They could add details on top and those would dissolve to give the illusion of flower fields.
Before water:


After water:

Thanks to Jacquelien at Kids Artists for the pretty project idea!

Ta da!


My bulletin board display:


Related Posts Plugin for WordPress, Blogger...